It’s that time of year again. What time is it, you wonder? Halloween? Or time to think about December holiday plans? No, it is time to do your physical inventory count. That is unless you have accurate inventory and now do cycle counts only. If so, congrats. That is a lot of hard work and discipline.
While working with finance teams to help them prepare and review their counts I have come across some interesting situations I wanted to share. The operations folks do a fine job of making sure the quantities are accurate but then those quantities turn into dollars (or Euros or pesos). The finance person then has to report how much inventory has been lost or gained during the count.
Since I have a soft spot for accountants as they are my people, I have put together some pre-count recommendations. This is based on the various emails, phone calls and meetings that occurred while inventory is being counted and completed. Here we go.
- Eliminate out layers not costed. This could be caused by:
- Negative Inventory in the warehouse.
- Negative Inventory in a location, if you are FIFO by part location.
- An issue (either work order or customer order) that caused inventory to go negative but in many cases the part now has positive inventory. Here’s an example: An overissue to a work order was created. To correct, the operations team does an issue-return. Visual will not connect these layers from FIFO purposes. The solution is to adjust in inventory so that the out layer now has a new layer to connect to. Then we adjust out the same quantity to put the on-hand quantity back to the original quantity. You might wonder, why do you need to do this? Well on a recent count, my client fixed a couple of parts with some really big overissues and offsetting issue-returns. The transactions for these 2 parts resulted in an unexpected pick-up of a few hundred thousand dollars. This was a positive impact to profit but it could have just as easily been the other direction.
- Ensure the On Hand Quantity reflects the sum of the Inventory Transactions. Periodically, these numbers will get out of sync. They can be found in Visual by running Inventory Valuation – Show Cost Layer Detail – Show Parts with Neg Bal Cost Layers.
To properly fix, your system administrator would need to run the VMFIXOHQ utility which will update the quantities on hand based on the sum of inventory transactions by part and warehouse location. This needs to be run when no one is in Visual ERP, so you might want to give your IT department some warning.
Let’s assume that you didn’t get this done. If I use the example below, the part_location would show you have -9 in stock but your FIFO layers and Inventory Balance Report shows 1.

What happens when you end the count? Your team counts 1. When the adjustment is made Visual compares the count quantity to the part location and adds 10 on an inventory adjustment. In this case, the Inventory Balance Report would show a quantity of 11 but count shows 1. Try explaining that to your auditor.

- Ensure you don’t have any Bad FIFO layers. This would be instances where the Costed Quantity (quantity used) is greater than the quantity received. This is rare but can happen. This can be found on the Inventory Valuation Report as described under Incorrect Quantity on Hand above. Or we have a script that can help you find it (see below). The solution for these is to run FORCE FIFO. This is a very powerful tool and should be run in a copy of your database first. This gives you the ability to assess the financial impact and determine the amount of time to run the utility and then to run full costing afterward.
- Ensure your standard costs are reasonable. Make sure there are no zero cost parts (unless they are free). If inventory is found during the count, Visual will use the standard cost from part maintenance to adjust them into inventory. This could go either direction financially.
- Recently, I had a client adjust-in quite a few parts at zero. They lost hundreds of thousands of dollars which was not a true loss. We had to fix these after the fact.
- On the other hand, if the standard is too high, then you have arbitrarily increased the value of your inventory. I have a client with a part with an actual cost of $30 but the standard cost was over $100. This incorrect standard cost caused an adjustment over $2 million which was so wrong. Good news was – we caught it before the count was ended and thus averted some really strange numbers.
- Ensure the Inventory Balance Report equals the Inventory Valuation Report. These two reports should be equal immediately after running full costing and before creating new transactions. If they aren’t then you have some work to do to find the differences. You can use Vlookups or Sumifs in Excel to compare the two reports. Many times, the solution will be to run “Recalculate Inventory Balances” for the problem parts.
This may seem like a lot of work but it may be easier than trying to explain strange numbers that resulted from your inventory count.
I do hope these 5 things will help you with your physical count. It will be easier and cleaner if you can do the following steps prior to the count:
- Eliminate out layers not costed.
- Ensure the On Hand Quantity reflects the sum of the Inventory Transactions. Extra reminder, give your IT department was notice so they can run the fix utility.
- Ensure there are no Bad FIFO layers.
- Ensure your standard costs are reasonable. Make sure there are no zero costs.
- Ensure the Inventory Balance Report equals the Inventory Valuation Report.
Is there an Easy Button?
You could run some scripts in Visual ERP’s query tool to find the problem transactions fairly quickly. For example: Bad FIFO layers would be: SELECT * FROM INVENTORY_TRANS WHERE COSTED_QTY > QTY. Sometimes the scripts will run much faster than running the reports in Visual ERP. I do like saving time.
I have used scripts and the Visual reports in the past to find these problems. On a recent inventory count, my client had the Inventory Deep Dive Reconciliation Tool. This made finding these problems a breeze. Under the Inventory Layers section, we found:
- Incorrect On Hand Quantity
- Out Layers Not Costed
- Bad FIFO Layers
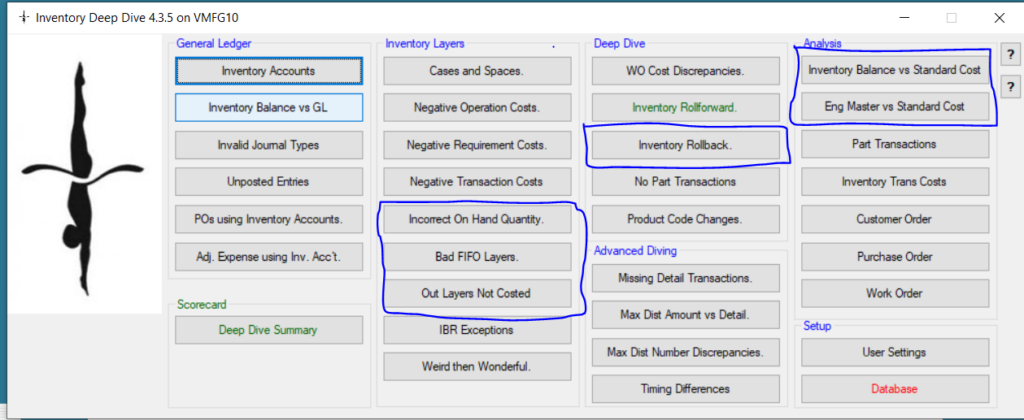
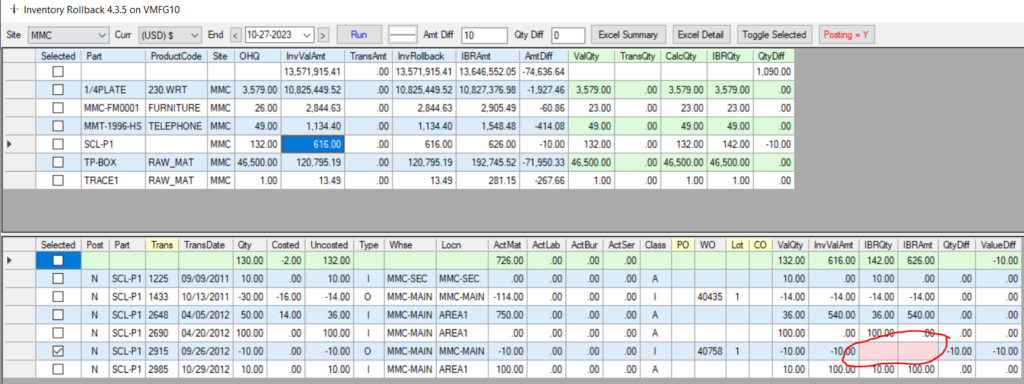
Under the Deep Dive section, we have the Inventory Rollback which compares the Inventory Valuation to the Inventory Balance Report. All in one screen. First, we can see the parts in one summary list. Then we have the drill down to show the specific differences which shown in pink.
To verify the standard costs, we have two options:
- Inventory Balance vs Standard Cost – We can use % and amount filters to focus on big differences for any parts with inventory. Again, this allows us to focus on the big problems.
- Engineering Masters vs Standard Cost – Again, there are filters and the ability to drill down to the structure of the Eng. Master. Makes it easier to look for things that can impact your standard costs. Some key things to look for:
- What is the desired quantity? If it is 1, check to ensure that fixed or set up costs aren’t used. If they are used and the typical run size is more, then the standard will be overstated.
- Do any of the required parts seem too high or low? The final part may actually be misstated because of a sub-assembly part ID is misstated. You could then dig deeper to see the structure for the sub-assembly.
I hope these 5 tips help you inventory count to run more smoothly.
Happy Counting!!